Tuesday, May 12, 2020

Gridcoin - The Good

In this post we will take an in depth look at the cryptocurrency Gridcoin, we show how we found two critical design vulnerabilities and how we fixed them.

In the last past years we saw many scientific publications about cryptocurrencies. Some focused on theoretical parts [Source] and some on practical attacks against specific well-known cryptocurrencies, like Bitcoin [Source]. But in general there is a lack of practical research against alternative coins. Or did you know that there are currently over 830 currencies listed online? So we asked ourselves how secure are these currencies, and if they are not just re-branded forks of the Bitcoin source code?

Background

Gridcoin is an Altcoin, which is in active development since 2013. It claims to provide a high sustainability, as it has very low energy requirements in comparison to Bitcoin. It rewards users for contributing computation power to scientific projects, published on the BOINC project platform. Although Gridcoin is not as widespread as Bitcoin, its draft is very appealing as it attempts to eliminate Bitcoin's core problems. It possesses a market capitalization of $13,719,142 (2017/08/10).

Berkeley Open Infrastructure for Network Computing

To solve general scientific meaningful problems, Gridcoin draws on the well-known Berkeley Open Infrastructure for Network Computing (BOINC). It is a software platform for volunteer computing, initially released in 2002 and developed by the University of California, Berkeley. It is an open source software licensed under the GNU Lesser General Public License. The platform enables professionals in need for computation power to distribute their tasks to volunteers. Nowadays it is widely used by researchers with limited resources to solve scientific problems, for example, healing cancer, investigate global warming, finding extraterrestrial intelligence in radio signals and finding larger prime numbers.
When launching a BOINC project, its maintainer is required to set up his own BOINC server. Project volunteers may then create accounts (by submitting a username, a password and an email address) and work on specific project tasks, called workunits. The volunteers can process the project tasks and transfer their solutions with a BOINC client.

BOINC architecture

BOINC uses a client-server architecture to achieve its rich feature set. The server component handles the client requests for workunits and the problem solutions uploaded by the clients. The solutions are validated and assimilated by the server component. All workunits are created by the server component and each workunit represents a chunk of a scientific problem which is encapsulated into an application. This application consists of one or multiple in-/output files, containing binary or ASCII encoded parameters.

BOINC terminology

  • iCPID
    • The BOINC project server creates the internal Cross Project Identifier (iCPID) as a 16 byte long random value during account creation. This value is stored by the client and server. From this time on, the iCPID is included in every request and response between client and server
  • eCPID
    • The external Cross Project Identifier (eCPID) serves the purpose of identifying a volunteer across different BOINC projects without revealing the corresponding email address. It is computed by applying the cryptographic hash function MD5 to (iCPID,email) and thus has a length of 16 byte [Source].
eCPID = MD5(iCPID||email)
  • Credits
    • BOINC credits are generated whenever a host submits a solution to an assigned task. They are measured in Cobblestone, whereas one Cobblestone is equivalent to 1/200 of CPU time on a reference machine with 1,000 mega floating point operation per seconds [Source]
  • Total Credit
    • Total number of Cubblestones a user invested with his machines for scientific computations
  • Recent Average Credit (RAC)
    • RAC is defined as the average number of Cobblestones per day generated recently [Source]. If an entire week passes, the value is divided by two. Thus old credits are weakly weighted. It is recalculated whenever a host generates credit [Source].

Gridcoin

As a fork of Litecoin, Gridcoin-Research is a blockchain based cryptocurrency and shares many concepts with Bitcoin. While Bitcoin's transaction data structure and concept is used in an unmodified version, Gridcoin-Research utilizes a slightly modified block structure. A Gridcoin-Research block encapsulates a header and body. The header contains needed meta information and the body encloses transactions. Due to the hashPrevBlockHeader field, which contains the hash of the previous block-header, the blocks are linked and form the distributed ledger, the blockchain. Blocks in the blockchain are created by so called minters. Each block stores a list of recent transactions in its body and further metadata in its header. To ensure that all transactions are confirmed in a decisive order, each block-header field contains a reference to the previous one. To regulate the rate in which new blocks are appended to the blockchain and to reward BOINC contribution, Gridcoin-Research implements another concept called Proof-of-Research. Proof-of-Research is a combination of a new overhauled Proof-of-BOINC concept, which was originally designed for Gridcoin-Classic and the improved Proof-of-Stake concept, inspired by alternative cryptocurrencies.

Fig. 1: Gridcoin block structure

Gridcoin terminology

In order to understand the attacks we need to introduce some Gridcoin specific terms.
  • eCPID
    • Identifier value from BOINC used in Gridcoin to identify the researcher.
  • CPIDv2
    • contains a checksum to prove that the minter is the owner of the used eCPID. We fully describe the content of this field in the last attack section.
  • GRCAddress
    • contains the payment address of the minter.
  • ResearchAge
    • is defined as the time span between the creation time of the last Proof-of-Research generated block with the user's eCPID and the time stamp of the last block in the chain measured in days.
  • RSAWeight
    • estimates the user's Gridcoin gain for the next two weeks, based on the BOINC contribution of the past two weeks.

Proof-of-Stake

Proof-of-Stake is a Proof-of-Work replacement, which was first utilized by the cryptocurrency Peercoin in 2012. This alternative concept was developed to showcase a working Bitcoin related currency with low power consumption. Therefore, the block generation process has been overhauled. To create a new valid block for the Gridcoin blockchain the following inequality have to be satisfied:

SHA256(SHA256(kernel)) < Target * UTXO Value + RSAWeight

The kernel value represents the concatenation of the parameters listed in Table 2. The referenced unspent transaction output (UTXO) must be at least 16 hours old. The so called RSAWeight is an input value to the kernel computation, it's indicates the average BOINC work, done by a Gridcoin minter.
In direct comparison to Bitcoin's Proof-of-Work concept, it is notable that the hash of the previous block-header is not part of the kernel. Consequently, it is theoretically possible to create a block at any previous point in time in the past. To prevent this, Gridcoin-Research creates fixed interval checkpoint blocks. Once a checkpoint block is synchronized with the network, blocks with older time stamps became invalid. Considering the nature of the used kernel fields, a client with only one UTXO is able to perform a hash calculation each time nTime is updated. This occurs every second, as nTime is a UNIX time stamp. To be able to change the txPrev fields and thereby increase his hash rate, he needs to gain more UTXO by purchasing coins. Note that high UTXO and RSAWeight values mitigate the difficulty of the cryptographic puzzle, which increase the chance of finding a valid kernel. RSAWeight was explained above. Once a sufficient kernel has been found, the referenced UTXO is spent in a transaction to the creator of the block and included in the generated block. This consumes the old UTXO and generates a new one with the age of zero.

The Gridcoin-Research concept does not require much electrical power, because the maximum hash rate of an entity is limited by its owned amount of UTXOs with suitable age.

Proof-of-Research

Minters relying solely on the Proof-of-Stake rewards are called Investors. In addition to Proof-of-Stake, Gridcoin gives minters a possibility to increase their income with Proof-of-Research rewards. The Proof-of-Research concept implemented in Gridcoin-Research allows the minters to highly increase their block reward by utilizing their BOINC Credits. In this case the minter is called a Researcher.
To reward BOINC contribution, relevant BOINC data needs to be stored in each minted block. Therefore, the software uses the BOINCHash data structure, which is encapsulated in the first transaction of each block. The structure encloses the fields listed in Table 6. The minting and verification process is shown in Figure 2 and works as follows:
  1. A minter (Researcher) participates in a BOINC project A and performs computational work for it. In return the project server increases the users Total Credit value on the server. The server therefore stores the minter's email address, iCPID, eCPID and RAC.
  2. Statistical websites contact project server and down-load the statistics for all users from the project server (A).
  3. After the user earns credits, his RAC increases. Consequently, this eases the finding of a solution for the Proof-of-Stake cryptographic puzzle, and the user can create (mint) a block and broadcast it to the Gridcoin network.
  4. Another minter (Investor or Researcher) will receive the block and validate it. Therefore, he extracts the values from the BOINCHash data structure inside the block.
  5. The minter uses the eCPID from the BOINCHash to request the RAC and other needed values from a statistical website and compares them to the data extracted from the BOINCHash structure, in the event that they are equal and the block solves the cryptographic puzzle, the block is accepted.

 Fig. 2: Gridcoin architecture and minting process

Reward calculation

The total reward for a solved block is called the Subsidy and is computed as the sum of the Proof-of-Research and the Proof-of-Stake reward.
If a minter operates as an Investor (without BOINC contribution), the eCPID is set to the string Investor and all other fields of the BOINCHash are zeroed. An Investor receives only a relatively small Proof-of-Stake reward.
Because the Proof-of-Research reward is much higher than its Proof-of-Stake counterpart, contributing to BOINC projects is more worth the effort.

Statistic Website

At the beginning of the blog post, the core concept behind BOINC was described. One functionality is the creation of BOINC Credits for users, who perform computational work for the project server. This increases the competition between BOINC users and therefore has a positive effect on the amount of computational work users commit. Different websites 4 collect credit information of BOINC users from known project servers and present them online. The Gridcoin client compares the RAC and total credit values stored in a new minted block with the values stored on cpid.gridcoin.us:5000/get_user.php?cpid=eCPID where eCPID is the actual value of the researcher. If there are differences, the client declines the block. In short, statistical websites are used as control instance for Gridcoin. It is obvious that gridcoin.us administrators are able to modify values of any user. Thus, they are able to manipulate the amount of Gridcoins a minter gets for his computational work. This is crucial for the trust level and undermines the general decentralized structure of a cryptocurrency.

Project Servers

Gridcoin utilizes BOINC projects to outsource meaningful computation tasks from the currency. For many known meaningful problems there exist project servers 5 that validate solutions submitted by users, 6 and decide how many credits the users receive for their solutions. Therefore, the project servers can indirectly control the amount of Gridcoins a minter gets for his minted block via the total credit value. As a result, a Gridcoin user also needs to trust the project administrators. This is very critical since there is no transparency in the credit system of project server. If you want to know why decentralization is not yet an option, see our paper from WOOT'17.

Attacks

In addition to the trust a Gridcoin user needs to put into the project server and statistic website administrators, Gridcoin suffers from serious flaws which allows the revelation of minter identities or even stealing coins. Our attacks do not rely on the Gridcoin trust issues and the attacker does not need to be in possession of specific server administrative rights. We assume the following two simple attackers with limited capability sets. The first one, is the blockchain grabber which can download the Gridcoin blockchain from an Internet resource and runs a program on the downloaded data. The second one, the Gridcoin attacker, acts as a normal Gridcoin user, but uses a modified Gridcoin client version, in order to run our attacks.

Interestingly, the developer of Gridcoin tried to make the source code analysis somewhat harder, by obfuscating the source code of relevant functions.
 Fig. 3: Obfuscated source code in Gridcoin [Source]

Grab Gridcoin user email addresses

In order to protect the email addresses of Gridcoin Researchers, neither BOINC project websites nor statistical websites directly include these privacy critical data. The statistical websites only include eCPID entries, which are used to reward Gridcoin Researchers. However, the email addresses are hidden inside the computation of the BOINCHash (cf. Table 1). A BOINCHash is created every time a Researcher mints a new block and includes a CPIDv2 value. The CPIDv2 value contains an obfuscated email address with iCPID and a hash over the previous blockchain block.
By collecting the blockchain data and reversing the obfuscation function (cf. Figure 4 and Figure 7), the attacker gets all email addresses and iCPIDs ever used by Gridcoin Researchers. See the reversed obfuscation function in Figure 4 and Figure 5.

Evaluation

We implemented a deobfuscation function (cf. Figure 7) and executed it on the blockchain. This way, we were able to retrieve all (2709) BOINC email addresses and iCPIDs used by Gridcoin Researchers. This is a serious privacy issue and we address it with our fix (cf. The Fix).

Steal Gridcoin users BOINC reward

The previous attack through deobfuscation allows us to retrieve iCPID values and email addresses. Thus, we have all values needed to create a new legitimate eCPID. This is required because the CPIDv2 contains the last block hash and requires a re-computation for every new block it should be used in. We use this fact in the following attack and show how to steal the computational work from another legitimate Gridcoin Researcher by mining a new Gridcoin block with forged BOINC information. Throughout this last part of the post, we assume the Gridcoin Minter attacker model where the attacker has a valid Gridcoin account and can create new blocks. However, the attacker does not perform any BOINC work.

 Tab. 1: BOINCHash structure as stored and used in the Gridcoin blockchain.
As stated at the beginning of the blog post, the pre-image of the eCPID is stored obfuscated in every Gridcoin block, which contains a Proof-of-Research reward. We gathered one pre-image from the minted blocks of our victim and deobfuscated it. Thus, we know the values of the iCPID, and the email address of our victim. Subsequently, use the hash of the last block created by the network and use these three values to create a valid CPIDv2. Afterwards we constructed a new block. In the block we also store the current BOINC values of our victim, which we can gather from the statistics websites. The final block is afterwards sent into the Gridcoin network. In case all values are computed correctly by the attacker, the network will accept the block, and resulting in a higher reward for the attacker, consisting of Proof-of-Stake and Proof-of-Research reward.


 Fig. 4: Obfuscation function  Fig. 5: Deobfuscation function

Evaluation

In order to verify our attacks practically, we created two virtual machines (R and A), both running Ubuntu 14.04.3 LTS. The virtual machine R contained a legitimate BOINC and Gridcoin instance. It represented the setup of a normal Gridcoin Researcher. The second machine A contained a modified Gridcoin-Research client 3.5.6.8 version, which tried to steal the Proof-of-Research reward of virtual machine R. Thus, we did not steal reward of other legitimate users. The victim BOINC client was attached to the SETI@home project 11 with the eCPID 9f502770e61fc03d23d8e51adf7c6291.
The victim and the attacker were in possession of Gridcoins, enabling them to stake currency and to create new blocks.
 Fig. 6: CPIDv2 calculation deobfuscated

Initially both Gridcoin-Research clients retrieved the blockchain from other Gridcoin nodes in the Gridcoin network.
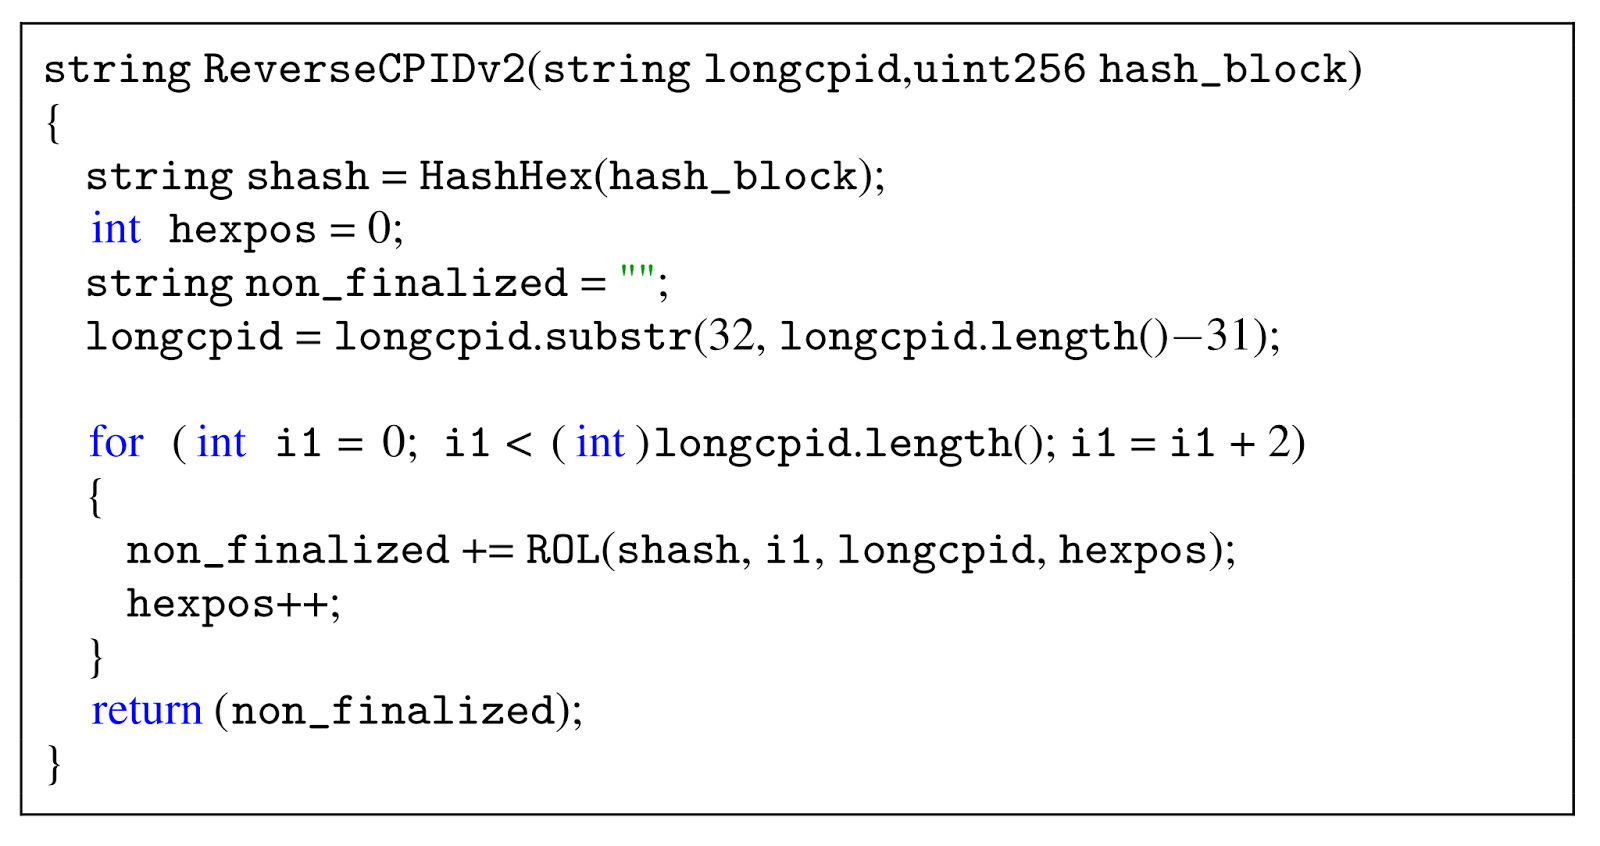
The Gridcoin attack client made it possible to specify the victim email address, iCPID and target project. All these values can be retrieved from the downloaded blockchain and our previous attack via the reverseCPIDv2 function as shown in Figure 7. The attack client read the iCPID and email address of the victim from a modified configuration file. All other values, for example, RAC or ResearchAge, were pulled from http://cpid.gridcoin.us:5000/get_user.php?cpid=. As soon as all values were received, the client attempted to create a new valid block.


 Fig. 7: Reverse the CPIDv2 calculation to get iCPID and email address

Once a block had been created and confirmed, the attacker received the increased coin reward with zero BOINC contribution done. The attack could only be detected by its victims because an outside user did not know the legitimate Gridcoin addresses a Researcher uses.
All blocks created with our victim's eCPID are shown in Table 2. Illegitimate blocks are highlighted. We were able to mint multiple illegitimate blocks, and thus stealing Research Age from our victim machine R. All nine blocks created and send by our attacker to the Gridcoin network passed the Gridcoin block verification, were confirmed multiple times, and are part of the current Gridcoin blockchain. During our testing timespan of approximately three weeks, the attacker machine was wrongfully rewarded with 72.4 Proof-of-Research generated Gridcoins, without any BOINC work. The results show that the attack is not only theoretically possible, but also very practical, feasible and effective. The attack results can be reproduced with our Gridcoin-Research-Attack client.

 Tab. 2:Blocks minted with the victim's eCPID

The Fix

In order to fix the security issue, we found one solution which does not require any changes to the BOINC source code nor the infrastructure. It is sufficient to change some parts of the already existing Gridcoin Beacon system. Thus, our solution is backwards compatible.
The current Gridcoin client utilizes so called Beacons to register new eCPIDs and stores them as a transaction of 0.0001 Gridcoins in a Superblock which is created every 24 hours. A Beacon encloses the user's personal eCPIDs, a corresponding unused (but irreversible) CPIDv2, and the wallet's main Gridcoin payment address. Once the Superblock is created, the eCPIDs is bound to one Gridcoin payment address. During the block verification process this bond is unfortunately not checked. Furthermore, the existing Beacon system does not use any strong asymmetric cryptography to ensure authenticity and integrity of the broadcasted data. We propose to extend the Beacon system with public key cryptography. In detail, we suggest that a user binds his fresh public key PK_1 to a newly generated eCPID, and then storing them together in a Superblock. An initial Beacon would therefore contain a hashed (e.g. SHA-256) eCPID, the public key, a Nonce, and a cryptographic signature created with the corresponding secret key SK_1 of the public key. This allows only the owner of the secret key to create valid signatures over blocks created with his eCPID. Thus, an adversary first needs to forge a cryptographic signature before he can claim Proof-of-Research work of another Gridcoin user. Thus, he is not capable of stealing the reward of the user.

Beacon to create a eCPID, public/secret key pair bond

For verification purposes nodes fetch the corresponding latest public key from one of the Superblocks. Furthermore, this Beacon structure allows a user to replace his previous public key associated with his eCPID. This is realized by submitting a new Beacon with a new public key PK_2, signed with his old secret key.

Beacon to update a eCPID, public/secret key pair bond

All Beacons in the chain are verifiable and the latest public key is always authentic. The Nonce provide freshness for the signature input, and therefore prevent replay attacks against the Beacon system.
Note that the eCPID needs to be completely unknown to the network, when sending the initial Beacon, for this concept to work as intended. The hash function ensures, that the Beacon does not reveal the fresh eCPID. As a result, an attacker is unable to mint with a eCPID even if he was able to intercept an initial Beacon and replaced the public key and signature with his own parameters, beforehand. This solution does not require any changes in the BOINC source code or the project servers.

Sign a block

In order to claim the Proof-of-Research reward for a newly created block, the Gridcoin minter computes a signature over the hash of the blockheader. Afterwards, he stores the resulting value at the end of the corresponding block in a new field. The private key used for the signature generation must correspond to the advertised public key by the user. It is important to note that the signature value is not part of the Merkle tree, and thus does not change the blockheader. In the end, the signature can then be verified by every other Gridcoin user via the advertised public key corresponding to the eCPID of the Gridcoin minter.

Responsible Disclosure

The attacks and the countermeasures were responsibly disclosed to the Gridcoin developer on the 14th of September, 2016. The developer used our proposed countermeasures and started to implement a new version. Since version 3.5.8.8, which is mandatory for all Gridcoin users, there exists an implementation, which contains countermeasures to our reward stealing attack.
See our next blog post, why Gridcoin is still insecure and should not be used anymore.

Further Reading
A more detailed description of Gridcoin and the attacks will be presented at WOOT'17, the paper is available here.

Authors

Tobias Niemann
Juraj Somorovsky
Related articles

  1. Que Es El Hacking Etico
  2. Hacking Time
  3. Wargames Hacking
  4. Javascript Hacking

CTF: FluxFingers4Future - Evil Corp Solution

For this years hack.lu CTF I felt like creating a challenge. Since I work a lot with TLS it was only natural for me to create a TLS challenge. I was informed that TLS challenges are quite uncommon but nevertheless I thought it would be nice to spice the competition up with something "unusual". The challenge mostly requires you to know a lot of details on how the TLS record layer and the key derivation works. The challenge was only solved by one team (0ops from China) during the CTF. Good job!


So let me introduce the challenge first.

The Challenge


You were called by the incident response team of Evil-Corp, the urgently need your help. Somebody broke into the main server of the company, bricked the device and stole all the files! Nothing is left! This should have been impossible. The hacker used some secret backdoor to bypass authentication. Without the knowledge of the secret backdoor other servers are at risk as well! The incident response team has a full packet capture of the incident and performed an emergency cold boot attack on the server to retrieve the contents of the memory (its a really important server, Evil Corp is always ready for such kinds of incidents). However they were unable to retrieve much information from the RAM, what's left is only some parts of the "key_block" of the TLS server. Can you help Evil-Corp to analyze the exploit the attacker used?

(Flag is inside of the attackers' secret message).


TT = Could not recover

key_block:
6B 4F 93 6A TT TT TT TT  TT TT 00 D9 F2 9B 4C B0
2D 88 36 CF B0 CB F1 A6  7B 53 B2 00 B6 D9 DC EF
66 E6 2C 33 5D 89 6A 92  ED D9 7C 07 49 57 AD E1
TT TT TT TT TT TT TT TT  56 C6 D8 3A TT TT TT TT
TT TT TT TT TT TT TT TT  94 TT 0C EB 50 8D 81 C4
E4 40 B6 26 DF E3 40 9A  6C F3 95 84 E6 C5 86 40
49 FD 4E F2 A0 A3 01 06

If you are not interested in the solution and want to try the challenge on your own first, do not read past this point. Spoilers ahead.


The Solution

So lets analyze first what we got. We have something called a "key_block" but we do not have all parts of it. Some of the bytes have been destroyed and are unknown to us. Additionally, we have a PCAP file with some weird messages in them. Lets look at the general structure of the message exchange first.


So looking at the IP address and TCP ports we see that the attacker/client was 127.0.0.1:36674 and was talking with the Server 127.0.0.1:4433. When looking at the individual messages we can see that the message exchange looked something like this:

ENC HS MESSAGE .... ENC HS MESSAGE ->
<- SERVER HELLO, CERTIFICATE, SERVER HELLO DONE
ENC HS MESSAGE .... ENC HS MESSAGE CCS ENC HS MESSAGE, ENC HS MESSAGE ->
<-CCS, ENC HS MESSAGE
ENC HEARTBEAT ->
<- ENC HEARTBEAT
-> ENC APPLICATION DATA
<- INTERNAL ERROR ... INTERNAL ERROR

So this message exchange appears weird. Usually the client is supposed to send a ClientHello in the beginning of the connection, and not encrypted handshake messages. The same is true for the second flight of the client. Usually it transmits its ClientKeyExchange message here, then a ChangeCipherSpec message and finally its Finished message. If we click at the first flight of the client, we can also see some ASCII text fragments in its messages.

Furthermore we can assume that the message sent after the ChangeCipherSpec from the server is actually a TLS Finished message.

Since we cannot read a lot from the messages the client is sending (in Wireshark at least), we can look at the messages the server is sending to get a better hold of what is going on. In the ServerHello message the server selects the parameters for the connection. This reveals that this is indeed a TLS 1.1 connection with TLS_RSA_WITH_AES_256_CBC_SHA , no compression and the Heartbeat Extension negotiated. We can also see that the ServerRandom is: 1023047c60b420bb3321d9d47acb933dbe70399bf6c92da33af01d4fb770e98c (note that it is always 32 bytes long, the UNIX time is part of the ServerRandom).

Looking at the certificate the server sent we can see that the server used a self-signed certificate for Evil.corp.com with an 800-bit RSA modulus:

00ad87f086a4e1acd255d1d77324a05ea7d250f285f3a6de35b9f07c5d083add5166677425b8335328255e7b562f944d55c56ff084f4316fdc9e3f5b009fefd65015a5ca228c94e3fd35c6aba83ea4e20800a34548aa36a5d40e3c7496c65bdbc864e8f161

and the public exponent 65537.


If you pay very close attention to the handshake you can see another weird thing. The size of the exchanged HeartbeatMessages is highly uneven. The client/attacker sent 3500 bytes, the server is supposed to decrypt these messages, and reflect the contents of them. However, the Server sent ~64000 bytes instead. The heartbeat extension became surprisingly well known in 2014, due to the Heartbleed bug in OpenSSL. The bug causes a buffer over-read on the server, causing it to reflect parts of its memory content in return to malicious heartbeat requests. This is a good indicator that this bug might play a role in this challenge.

But what is this key_block thing we got from the incident response team? TLS 1.1 CBC uses 4 symmetric keys in total. Both parties derive these keys from the "master secret" as the key_block. This key_block is then chunked into the individual keys. You can imagine the key_block as some PRF output and both parties knowing which parts of the output to use for which individual key. In TLS 1.1 CBC the key_block is chunked as follows: The first N bytes are the client_write_MAC key, the next N bytes are the server_write_MAC key, the next P bytes are the client_write key and the last P bytes are the server_write key. N is the length of the HMAC key (which is at the time of writing for all cipher suites the length of the HMAC) and P is the length of the key for the block cipher.

In the present handshake AES-256 was negotiated as the block cipher and SHA (SHA-1) was negotiated for the HMAC. This means that N is 20 (SHA-1 is 20 bytes) and P is 32 (AES-256 requires 32 bytes of key material).

Looking at the given key_block we can chunk it into the individual keys:
client_write_MAC = 6B4F936ATTTTTTTTTTTT00D9F29B4CB02D8836CF
server_write_MAC = B0CBF1A67B53B200B6D9DCEF66E62C335D896A92
client_write = EDD97C074957ADE1TTTTTTTTTTTTTTTT56C6D83ATTTTTTTTTTTTTTTTTTTTTTTT
server_write = 94TT0CEB508D81C4E440B626DFE3409A6CF39584E6C5864049FD4EF2A0A30106

Since not all parts of the key_block are present, we can see that we actually have 14/20 bytes of the client_write_MAC key, the whole server_write_MAC key, 12/32 bytes of the client_write key and 31/32 bytes of the server_write key.

The client_write_MAC key is used in the HMAC computations from the client to the server (the server uses the same key to verify the HMAC),
The server_write_MAC key is used in the HMAC computations from the server to the client (the client uses the same key to verify the HMAC),
The client_write key is used to encrypt messages from the client to the server, while the server_write key is used to encrypt messages from the server to the client.

So looking at the keys we could compute HMAC's from the client if we could guess the remaining 6 bytes. We could compute HMAC's from the server directly, we have not enough key material to decrypt the client messages, but we could decrypt server messages if we brute-forced one byte of the server_write key. But how would you brute force this byte? When do we know when we got the correct key? Lets look at how the TLS record layer works to find out :)

The Record Layer

TLS consists out of multiple protocols (Handshake, Alert, CCS, Application (and Heartbeat)). If one of those protocols wants to send any data, it has to pass this data to the record layer. The record layer will chunk this data, compress it if necessary, encrypt it and attach a "record header" to it.


This means, that if we want to decrypt a message we know that if we used the correct key the message should always have a correct padding. If we are unsure we could even check the HMAC with the server_write_MAC key.

In TLS 1.0 - TLS 1.2 the padding looks like this:

1 byte padding  : 00
2 bytes padding: 01 01
3 bytes padding: 02 02 02
4 bytes padding: 03 03 03 03
...

So if we guessed the correct key we know that the plaintext has to have valid padding.
An ideal candidate for our brute force attack is the server Finished message. So lets use that to check our key guesses.
The ciphertext looks like this:
0325f41d3ebaf8986da712c82bcd4d55c3bb45c1bc2eacd79e2ea13041fc66990e217bdfe4f6c25023381bab9ddc8749535973bd4cacc7a4140a14d78cc9bddd


The first 16 bytes of the ciphertext are the IV:
IV: 0325f41d3ebaf8986da712c82bcd4d55
Therefore the actual ciphertext is:
Ciphertext: c3bb45c1bc2eacd79e2ea13041fc66990e217bdfe4f6c25023381bab9ddc8749535973bd4cacc7a4140a14d78cc9bddd

The 256 key candidates are quick to check, and it is revealed that 0xDC was the missing byte.
(The plaintext of the Finished is 1400000C455379AAA141E1B9410B413320C435DEC948BFA451C64E4F30FE5F6928B816CA0B0B0B0B0B0B0B0B0B0B0B0B)

Now that we have the full server_write key we can use it to decrypt the heartbeat records.

This is done in the same way as with the Finished. Looking at the decrypted heartbeat messages we can see a lot of structured data, which is an indicator that we are actually dealing
with the Heartbleed bug. If we convert the content of the heartbeat messages to ASCII we can actually see that the private key of the server is PEM encoded in the first heartbeat message.

Note: This is different to a real heartbeat exploit. Here you don't usually get the private key nicely encoded but have to extract it using the coppersmith's attack or similar things. I did not want to make this challenge even harder so I was so nice to write it to the memory for you :)


The private key within the Heartbeat messages looks like this:
-----BEGIN RSA PRIVATE KEY-----
MIIB3gIBAAJlAK2H8Iak4azSVdHXcySgXqfSUPKF86beNbnwfF0IOt1RZmd0Jbgz
UyglXntWL5RNVcVv8IT0MW/cnj9bAJ/v1lAVpcoijJTj/TXGq6g+pOIIAKNFSKo2
pdQOPHSWxlvbyGTo8WECAwEAAQJkJj95P2QmLb5qlgbj5SXH1zufBeWKb7Q4qVQd
RTAkMVXYuWK7UZ9Wa9nYulyjvg9RoWOO+SaDNqhiTWKosQ+ZrvG3A1TDMcVZSkPx
bXCuhhRpp4j0T9levQi0s8tR1YuFzVFi8QIzANNLrgK2YOJiDlyu78t/eVbBey4m
uh2xaxvEd8xGX4bIBlTuWlKIqwPNxE8fygmv4uHFAjMA0j7Uk1ThY+UCYdeCm4/P
eVqkPYu7jNTHG2TGr/B6hstxyFpXBlq6MJQ/qPdRXLkLFu0CMwCf/OLCTQPpBiQn
y5HoPRpMNW4m0M4F46vdN5MaCoMUU+pvbpbXfYI3/BrTapeZZCNfnQIzAJ7XzW9K
j8cTPIuDcS/qpQvAiZneOmKaV5vAtcQzYb75cgu3BUzNuyH8v2P/Br+RJmm5AjMA
jp9N+xdEm4dW51lyUp6boVU6fxZimfYRfYANU2bVFmbsSAU9jzjWb0BuXexKKcX7
XGo=
-----END RSA PRIVATE KEY-----

We should store it in a file and decode it with OpenSSL to get the actual key material.

>> openssl rsa -in key.pem -text -noout
RSA Private-Key: (800 bit, 2 primes)
modulus:
    00:ad:87:f0:86:a4:e1:ac:d2:55:d1:d7:73:24:a0:
    5e:a7:d2:50:f2:85:f3:a6:de:35:b9:f0:7c:5d:08:
    3a:dd:51:66:67:74:25:b8:33:53:28:25:5e:7b:56:
    2f:94:4d:55:c5:6f:f0:84:f4:31:6f:dc:9e:3f:5b:
    00:9f:ef:d6:50:15:a5:ca:22:8c:94:e3:fd:35:c6:
    ab:a8:3e:a4:e2:08:00:a3:45:48:aa:36:a5:d4:0e:
    3c:74:96:c6:5b:db:c8:64:e8:f1:61
publicExponent: 65537 (0x10001)
privateExponent:
    26:3f:79:3f:64:26:2d:be:6a:96:06:e3:e5:25:c7:
    d7:3b:9f:05:e5:8a:6f:b4:38:a9:54:1d:45:30:24:
    31:55:d8:b9:62:bb:51:9f:56:6b:d9:d8:ba:5c:a3:
    be:0f:51:a1:63:8e:f9:26:83:36:a8:62:4d:62:a8:
    b1:0f:99:ae:f1:b7:03:54:c3:31:c5:59:4a:43:f1:
    6d:70:ae:86:14:69:a7:88:f4:4f:d9:5e:bd:08:b4:
    b3:cb:51:d5:8b:85:cd:51:62:f1
prime1:
    00:d3:4b:ae:02:b6:60:e2:62:0e:5c:ae:ef:cb:7f:
    79:56:c1:7b:2e:26:ba:1d:b1:6b:1b:c4:77:cc:46:
    5f:86:c8:06:54:ee:5a:52:88:ab:03:cd:c4:4f:1f:
    ca:09:af:e2:e1:c5
prime2:
    00:d2:3e:d4:93:54:e1:63:e5:02:61:d7:82:9b:8f:
    cf:79:5a:a4:3d:8b:bb:8c:d4:c7:1b:64:c6:af:f0:
    7a:86:cb:71:c8:5a:57:06:5a:ba:30:94:3f:a8:f7:
    51:5c:b9:0b:16:ed
exponent1:
    00:9f:fc:e2:c2:4d:03:e9:06:24:27:cb:91:e8:3d:
    1a:4c:35:6e:26:d0:ce:05:e3:ab:dd:37:93:1a:0a:
    83:14:53:ea:6f:6e:96:d7:7d:82:37:fc:1a:d3:6a:
    97:99:64:23:5f:9d
exponent2:
    00:9e:d7:cd:6f:4a:8f:c7:13:3c:8b:83:71:2f:ea:
    a5:0b:c0:89:99:de:3a:62:9a:57:9b:c0:b5:c4:33:
    61:be:f9:72:0b:b7:05:4c:cd:bb:21:fc:bf:63:ff:
    06:bf:91:26:69:b9
coefficient:
    00:8e:9f:4d:fb:17:44:9b:87:56:e7:59:72:52:9e:
    9b:a1:55:3a:7f:16:62:99:f6:11:7d:80:0d:53:66:
    d5:16:66:ec:48:05:3d:8f:38:d6:6f:40:6e:5d:ec:
    4a:29:c5:fb:5c:6a

So now we got the private key. But what do we do with it? Since this is an RSA handshake we should be able to decrypt the whole session (RSA is not perfect forward secure). Loading it into Wireshark does not work, as Wireshark is unable to read the messages sent by the client. What is going on there?

De-fragmentation


So if you do not yet have a good idea of what the record layer is for, you can imagine it like envelops. If someone wants to send some bytes, you have to put them in an envelop and transmit them. Usually implementations use one big envelop for every message, however you can also send a single message in multiple envelops.

The attacker did exactly that. He fragmented its messages into multiple records. This is not very common for handshake messages but fine according to the specification and accepted by almost all implementations. However, Wireshark is unable to decode these kinds of messages and therefore unable to use our private key to decrypt the connection. So we have to do this step manually.

So each record has the following fields:
Type | Version | Length | Data
If we want to reconstruct the ClientHello message we have to get all the data fields of the records of the first flight and decode them.
This is simply done by clicking on each record in Wireshark and concatenating the data fields. This step is at least on my Wireshark version (3.0.5) not very easy as the copying is actually buggy, and Wireshark is not copying the correct bytes.

 As you can see in the image, the record is supposed to have a length of 8 bytes, but Wireshark is only copying 4 bytes. I am not sure if this bug is actually only in my version or affects all Wireshark versions. Instead of copying the records individually I therefore copied the whole TCP payload and chunked it manually into the individual records.

16030200080100009e03020000
160302000800000000004e6f62
16030200086f64796b6e6f7773
1603020008696d616361740000
16030200080000000000002053
1603020008746f70206c6f6f6b
1603020008696e67206e6f7468
1603020008696e6720746f2066
1603020008696e646865726500
16030200080200350100005300
16030200080f00010113370015
16030200084576696c436f7270
1603020008206b696c6c732070
1603020008656f706c65000d00
16030200082c002a0102020203
16030200080204020502060201
16030200080102010301040105
16030200080106010103020303
160302000803040305030603ed
1603020008edeeeeefefff0100
16030200020100

If we structure this data it looks like this:
Type  Version Length  Payload
16    0302    0008    0100009e03020000
16    0302    0008    00000000004e6f62
16    0302    0008    6f64796b6e6f7773
16    0302    0008    696d616361740000
16    0302    0008    0000000000002053
16    0302    0008    746f70206c6f6f6b
16    0302    0008    696e67206e6f7468
16    0302    0008    696e6720746f2066
16    0302    0008    696e646865726500
16    0302    0008    0200350100005300
16    0302    0008    0f00010113370015
16    0302    0008    4576696c436f7270
16    0302    0008    206b696c6c732070
16    0302    0008    656f706c65000d00
16    0302    0008    2c002a0102020203
16    0302    0008    0204020502060201
16    0302    0008    0102010301040105
16    0302    0008    0106010103020303
16    0302    0008    03040305030603ed
16    0302    0008    edeeeeefefff0100
16    0302    0002    0100

The actual message is the concatenation of the record payloads:

0100009e0302000000000000004e6f626f64796b6e6f7773696d6163617400000000000000002053746f70206c6f6f6b696e67206e6f7468696e6720746f2066696e64686572650002003501000053000f000101133700154576696c436f7270206b696c6c732070656f706c65000d002c002a010202020302040205020602010102010301040105010601010302030303040305030603ededeeeeefefff01000100

So what is left is to parse this message. There is an easy way on how to do this an a labor intensive manual way. Lets do the manual process first :) .
We know from the record header that his message is in fact a handshake message (0x16).
According to the specification handshake messages look like this:
    
      struct {
          HandshakeType msg_type;    /* handshake type */
          uint24 length;             /* bytes in message */
          select (HandshakeType) {
              case hello_request:       HelloRequest;
              case client_hello:        ClientHello;
              case server_hello:        ServerHello;
              case certificate:         Certificate;
              case server_key_exchange: ServerKeyExchange;
              case certificate_request: CertificateRequest;
              case server_hello_done:   ServerHelloDone;
              case certificate_verify:  CertificateVerify;
              case client_key_exchange: ClientKeyExchange;
              case finished:            Finished;
          } body;
      } Handshake;
    
This is RFC speak for: Each handshake message starts with a type field which says which handshake message this is, followed by a 3 byte length field which determines the length of rest of the handshake message.
So in our case the msg_type is 0x01 , followed by a 3 Byte length field (0x00009e, 158[base10]). 0x01 means ClientHello (https://www.iana.org/assignments/tls-parameters/tls-parameters.xhtml#tls-parameters-7). This means we have to parse the bytes after the length field as a ClientHello.
    
      {
          ProtocolVersion client_version;
          Random random;
          SessionID session_id;
          CipherSuite cipher_suites<2..2^16-2>;
          CompressionMethod compression_methods<1..2^8-1>;
          select (extensions_present) {
              case false:
                  struct {};
              case true:
                  Extension extensions<0..2^16-1>;
          };
      } ClientHello;

This means: The next 2 bytes are the ProtocolVersion, the next 32 bytes are the ClientRandom, the next byte is the SessionID Length, the next SessionID Length many bytes are the SessionID, the next 2 bytes are the CipherSuite Length bytes, followed by CipherSuite Length many CipherSuites, followed by a 1 byte Compression Length field, followed by Compression Length many CompressionBytes followed by a 2 byte Extension Length field followed by extension length many ExtensionBytes. So lets try to parse this:

Handshakye Type   : 01
Handshake Length  : 00009e
ProtocolVersion   : 0302
ClientRandom      : 000000000000004e6f626f64796b6e6f7773696d616361740000000000000000
SessionID Length  : 20
SessionID         : 53746f70206c6f6f6b696e67206e6f7468696e6720746f2066696e6468657265
CipherSuite Length: 0002
CipherSuites      : 0035
Compression Length: 01
CompressionBytes  : 00
Extension Length  : 0053
ExtensionBytes:   : 000f000101133700154576696c436f7270206b696c6c732070656f706c65000d002c002a010202020302040205020602010102010301040105010601010302030303040305030603ededeeeeefefff01000100

This is manual parsing is the slow method of dealing with this. Instead of looking at the specification to parse this message we could also compare the message structure to another ClientHello. This eases this process a lot. What we could also do is record the transmission of this message as a de-fragmented message to something and let Wireshark decode it for us. To send the de-fragmented message we need to create a new record header ourselves. The record should look like this:

Type   : 16
Version: 0302
Length : 00A2
Payload: 0100009e0302000000000000004e6f626f64796b6e6f7773696d6163617400000000000000002053746f70206c6f6f6b696e67206e6f7468696e6720746f2066696e64686572650002003501000053000f000101133700154576696c436f7270206b696c6c732070656f706c65000d002c002a010202020302040205020602010102010301040105010601010302030303040305030603ededeeeeefefff01000100

To send this record we can simply use netcat:


echo '16030200A20100009e0302000000000000004e6f626f64796b6e6f7773696d6163617400000000000000002053746f70206c6f6f6b696e67206e6f7468696e6720746f2066696e64686572650002003501000053000f000101133700154576696c436f7270206b696c6c732070656f706c65000d002c002a010202020302040205020602010102010301040105010601010302030303040305030603ededeeeeefefff01000100' | xxd -r -p | nc localhost 4433


Now we can use Wireshark to parse this message. As we can see now, the weired ASCII fragments we could see in the previous version are actually the ClientRandom, the SessionID, and a custom extension from the attacker. Now that we have de-fragmented the message, we know the ClientRandom: 000000000000004e6f626f64796b6e6f7773696d616361740000000000000000


De-fragmenting the ClientKeyExchange message


Now that we have de-fragmented the first flight from the attacker, we can de-fragment the second flight from the client. We can do this in the same fashion as we de-fragmented the ClientHello.

16    0302    0008    1000006600645de1
16    0302    0008    66a6d3669bf21936
16    0302    0008    5ef3d35410c50283
16    0302    0008    c4dd038a1b6fedf5
16    0302    0008    26d5b193453d796f
16    0302    0008    6e63c144bbda6276
16    0302    0008    3740468e21891641
16    0302    0008    0671318e83da3c2a
16    0302    0008    de5f6da6482b09fc
16    0302    0008    a5c823eb4d9933fe
16    0302    0008    ae17d165a6db0e94
16    0302    0008    bb09574fc1f7b8ed
16    0302    0008    cfbcf9e9696b6173
16    0302    0002    f4b6

14    0302    0001    01

16    0302    0030    cbe6bf1ae7f2bc40a49709a06c0e3149a65b8cd93c2525b5bfa8f696e29880d3447aef3dc9a996ca2aff8be99b1a4157
16    0302    0030    9bf02969ca42d203e566bcc696de08fa80e0bfdf44b1b315aed17fe867aed6d0d600c73de59c14beb74b0328eacadcf9

Note that his time we have 3 record groups. First there is chain of handshake records, followed by a ChangeCipherSpec record, followed by 2 more handshake records. The TLS specification forbids that records of different types are interleaved. This means that the first few records a probably forming a group of messages. The ChangeCipherSpec record is telling the server that subsequent messages are encrypted. This seems to be true, since the following records do not appear to be plaintext handshake messages.

So lets de-fragment the first group of records by concatenating their payloads:

1000006600645de166a6d3669bf219365ef3d35410c50283c4dd038a1b6fedf526d5b193453d796f6e63c144bbda62763740468e218916410671318e83da3c2ade5f6da6482b09fca5c823eb4d9933feae17d165a6db0e94bb09574fc1f7b8edcfbcf9e9696b6173f4b6

Since this is a handshake message, we know that the first byte should tell us which handshake message this is. 0x10 means this is a ClientKeyExchange message. Since we already know that TLS_RSA_WITH_AES_256_CBC_SHA was negotiated for this connection, we know that this is an RSA ClientKeyExchange message.

These messages are supposed to look like this (I will spare you the lengthy RFC definition):

Type (0x10)
Length (Length of the content) (3 bytes)
EncryptedPMS Length(Length of the encrypted PMS) (2 bytes)
EncrpytedPMS  (EncryptedPMS Length many bytes)
    
For our message this should look like this:

Type: 10
Length: 000066
Encrypted PMS Length: 0064
Encrypted PMS: 5de166a6d3669bf219365ef3d35410c50283c4dd038a1b6fedf526d5b193453d796f6e63c144bbda62763740468e218916410671318e83da3c2ade5f6da6482b09fca5c823eb4d9933feae17d165a6db0e94bb09574fc1f7b8edcfbcf9e9696b6173f4b6

Now that we got the Encrypted PMS we can decrypt it with the private key. Since the connection negotiated RSA as the key exchange algorithm this is done with:

encPMS^privKey mod modulus = plainPMS

We can solve this equation with the private key from the leaked PEM file.

2445298227328938658090475430796587247849533931395726514458166123599560640691186073871766111778498132903314547451268864032761115999716779282639547079095457185023600638251088359459150271827705392301109265654638212139757207501494756926838535350 ^ 996241568615939319506903357646514527421543094912647981212056826138382708603915022492738949955085789668243947380114192578398909946764789724993340852568712934975428447805093957315585432465710754275221903967417599121549904545874609387437384433 mod 4519950410687629988405948449295924027942240900746985859791939647949545695657651701565014369207785212702506305257912346076285925743737740481250261638791708483082426162177210620191963762755634733255455674225810981506935192783436252402225312097

Solving this equation gives us:

204742908894949049937193473353729060739551644014729690547520028508481967333831905155391804994508783506773012994170720979080285416764402813364718099379387561201299457228993584122400808905739026823578773289385773545222916543755807247900961

in hexadecimal this is:

00020325f41d3ebaf8986da712c82bcd4d554bf0b54023c29b624de9ef9c2f931efc580f9afb081b12e107b1e805f2b4f5f0f1000302476574204861636b6564204e6f6f622c20796f752077696c6c206e65766572206361746368206d65212121212121

The PMS is PKCS#1.5 encoded. This means that it is supposed to start with 0x0002 followed by a padding which contains no 0x00 bytes, followed by a separator 0x00 byte followed by a payload. In TLS, the payload has to be exactly 48 bytes long and has to start with the highest proposed protocol version of the client. We can see that this is indeed the case for our decrypted payload. The whole decrypted payload is the PMS for the connection.

This results in the PMS: 0302476574204861636b6564204e6f6f622c20796f752077696c6c206e65766572206361746368206d65212121212121 (which besides the protocol version is also ASCII :) )

Now that we have the PMS its time to revisit the key scheduling in TLS. We already briefly touched it but here is a overview:

As you can see, we first have to compute the master secret. With the master secret we can reconstruct the key_block. If we have computed the key_block, we can finally get the client_write key and decrypt the message from the attacker.


master secret = PRF ( PMS, "master secret", ClientRandom | ServerRandom)

key_block = PRF (master_secret, "key expansion", ServerRandom |  ClientRandom )

Where "master secret" and "key expansion" are literally ASCII Strings.


Note that in the key_block computation ClientRandom and ServerRandom are exchanged.


To do this computation we can either implement the PRF ourselfs, or easier, steal it from somewhere. The PRF in TLS 1.1 is the same as in TLS 1.0. Good places to steal from are for example openssl (C/C++), the scapy project (python), the TLS-Attacker project (java) or your favourite TLS library. The master secret is exactly 48 bytes long. The length of the key_block varies depending on the selected cipher suite and protocol version. In our case we need 2 * 20 bytes (for the 2 HMAC keys) + 2 * 32 bytes (for the 2 AES keys) = 104 bytes.

I will use the TLS-Attacker framework for this computation. The code will look like this:


This results in the following master secret: 292EABADCF7EFFC495825AED17EE7EA575E02DF0BAB7213EC1B246BE23B2E0912DA2B99C752A1F8BD3D833E8331D649F  And the following key_block:
6B4F936ADE9B4010393B00D9F29B4CB02D8836CFB0CBF1A67B53B200B6D9DCEF66E62C335D896A92EDD97C074957ADE136D6BAE74AE8193D56C6D83ACDE6A3B365679C5604312A1994DC0CEB508D81C4E440B626DFE3409A6CF39584E6C5864049FD4EF2A0A30106

Now we can chunk our resulting key_block into its individual parts. This is done analogously to the beginning of the challenge.

client_write_mac key = 6B4F936ADE9B4010393B00D9F29B4CB02D8836CF
server_write_mac key = B0CBF1A67B53B200B6D9DCEF66E62C335D896A92
client_write key = EDD97C074957ADE136D6BAE74AE8193D56C6D83ACDE6A3B365679C5604312A19
server_write key = 94DC0CEB508D81C4E440B626DFE3409A6CF39584E6C5864049FD4EF2A0A30106

Now that we have the full client_write key we can use that key to decrypt the application data messages. But these messages are also fragmented. But since the messages are now encrypted, we cannot simply concatenate the payloads of the records, but we have to decrypt them individually and only concatenate the resulting plaintext.

Analogue to the decryption of the heartbeat message, the first 16 bytes of each encrypted record payload are used as an IV

IV, Ciphertext Plaintext
6297cb6d9afba63ec4c0dd7ac0184570    a9c605307eb5f8ccbe8bbc210ff1ff14943873906fad3eca017f49af8feaec87      557365723A20726FB181CF546350A88ACBE8D0248D6FF07675D1514E03030303
063c60d43e08c4315f261f8a4f06169a    cdb5818d80075143afe83c79b570ab0b349b2e8748f8b767c54c0133331fb886    6F743B0A50617373D6F734D45FB99850CCAF32DF113914FC412C523603030303
cd839b95954fcadf1e60ee983cbe5c21    ac6f6e1fe34ae4b1214cded895db4746b8e38d7960d7d45cb001aab8e18c7fc7    3A20726F6F743B0A937048A265327642BD5626E00E4BC79618F9A95C03030303
8092d75f72b16cb23a856b00c4c39898    8df099441e10dca5e850398e616e4597170796b7202e2a8726862cd760ebacdf    6563686F20224F7769EACFBEEB5EE5D1F0B72306F8C78AD86CB4835003030303
8e9f83b015fce7f9c925b8b64abee426    224a5fbd2d9b8fc6ded34222a943ec0e8e973bcf125b81f918e391a22b4b0e65    6E6564206279204061736E93BFDC5103C8C2FE8C543A72B924212E8403030303
0e24ba11e41bfcf66452dc80221288ce    a66fb3aed9bdc7e08a31a0e7f14e11ce0983ec3d20dd47c179425243b14b08c9    6963306E7A31223B84A3CAFA7980B461DE0A6410D6251551AE401DD903030303
0465fdb05b121cdc08fa01cdacb2c8f4    eff59402f4dbf35a85cc91a6d1264a895cd1b3d2014c91fbba03ec4c85d058c9     0A7375646F20726DB97422D8B30C54CC672FFEC3E9D771D4743D96B903030303
e2ddbbb83fe8318c41c26d57a5813fab    89549a874ff74d83e182de34ecf55fff1a57008afd3a29ef0d839b991143cd2a      202F202D72663B0A996F3F1789CB9B671223E73C66A0BA578D0C0F3203030303
524f5210190f73c984bd6a59b9cf424c    b7f30fafe5ea3ac51b6757c51911e86b0aa1a6bbf4861c961f8463154acea315    0A666C61677B436868BF764B01D2CDCB2C06EA0DFC5443DABB6EC9AE03030303
32765985e2e594cddca3d0f45bd21f49    a5edfe89fdb3782e2af978585c0e27ba3ef90eb658304716237297f97e4e72bc    696D696368616E67FBF32127FA3AF2F97770DE5B9C6D376A254EF51E03030303
e0ae69b1fa54785dc971221fd92215fb    14e918a9e6e37139153be8cb9c16d2a787385746f9a80d0596580ba22eaf254e    61467233346B7D8BE8B903A167C44945E7676BF99D888A4B86FA8E0404040404

The plaintext then has to be de-padded and de-MACed.

Data HMAC Pad:
557365723A20726F    B181CF546350A88ACBE8D0248D6FF07675D1514E    03030303
6F743B0A50617373    D6F734D45FB99850CCAF32DF113914FC412C5236    03030303
3A20726F6F743B0A    937048A265327642BD5626E00E4BC79618F9A95C    03030303
6563686F20224F77    69EACFBEEB5EE5D1F0B72306F8C78AD86CB48350    03030303
6E65642062792040    61736E93BFDC5103C8C2FE8C543A72B924212E84    03030303
6963306E7A31223B    84A3CAFA7980B461DE0A6410D6251551AE401DD9    03030303
0A7375646F20726D    B97422D8B30C54CC672FFEC3E9D771D4743D96B9    03030303
202F202D72663B0A    996F3F1789CB9B671223E73C66A0BA578D0C0F32    03030303
0A666C61677B4368    68BF764B01D2CDCB2C06EA0DFC5443DABB6EC9AE    03030303
696D696368616E67    FBF32127FA3AF2F97770DE5B9C6D376A254EF51E    03030303
61467233346B7D      8BE8B903A167C44945E7676BF99D888A4B86FA8E    0404040404

This then results in the following data:

Data:
557365723A20726F6F743B0A506173733A20726F6F743B0A6563686F20224F776E656420627920406963306E7A31223B0A7375646F20726D202F202D72663B0A0A666C61677B4368696D696368616E6761467233346B7D8B

Which is ASCII for:

User: root;
Pass: root;
echo "Owned by @ic0nz1";
sudo rm / -rf;

flag{ChimichangaFr34k}


Honestly this was quite a journey. But this presented solution is the tedious manual way. There is also a shortcut with which you can skip most of the manual cryptographic operations.

The Shortcut

After you de-fragmented the messages you can patch the PCAP file and then use Wireshark to decrypt the whole session. This way you can get the flag without performing any cryptographic operation after you got the private key. Alternatively you can replay the communication and record it with Wireshark. I will show you the replay of the messages. To recap the de-fragmented messages looks like this:

ClientHello
0100009e0302000000000000004e6f626f64796b6e6f7773696d6163617400000000000000002053746f70206c6f6f6b696e67206e6f7468696e6720746f2066696e64686572650002003501000053000f000101133700154576696c436f7270206b696c6c732070656f706c65000d002c002a010202020302040205020602010102010301040105010601010302030303040305030603ededeeeeefefff01000100

ClientKeyExchange:
1000006600645de166a6d3669bf219365ef3d35410c50283c4dd038a1b6fedf526d5b193453d796f6e63c144bbda62763740468e218916410671318e83da3c2ade5f6da6482b09fca5c823eb4d9933feae17d165a6db0e94bb09574fc1f7b8edcfbcf9e9696b6173f4b6

We should now add new (not fragmented) record header to the previously fragmented message. The messages sent from the server can stay as they are. The ApplicationData from the client can also stay the same. The messages should now look like this

ClientHello
16030200A20100009e0302000000000000004e6f626f64796b6e6f7773696d6163617400000000000000002053746f70206c6f6f6b696e67206e6f7468696e6720746f2066696e64686572650002003501000053000f000101133700154576696c436f7270206b696c6c732070656f706c65000d002c002a010202020302040205020602010102010301040105010601010302030303040305030603ededeeeeefefff01000100

ServerHello / Certificate / ServerHelloDone
160302006A1000006600645de166a6d3669bf219365ef3d35410c50283c4dd038a1b6fedf526d5b193453d796f6e63c144bbda62763740468e218916410671318e83da3c2ade5f6da6482b09fca5c823eb4d9933feae17d165a6db0e94bb09574fc1f7b8edcfbcf9e9696b6173f4b61403020001011603020030cbe6bf1ae7f2bc40a49709a06c0e3149a65b8cd93c2525b5bfa8f696e29880d3447aef3dc9a996ca2aff8be99b1a415716030200309bf02969ca42d203e566bcc696de08fa80e0bfdf44b1b315aed17fe867aed6d0d600c73de59c14beb74b0328eacadcf9

ClientKeyExchange / ChangeCipherSpec / Finished
160302006A1000006600645de166a6d3669bf219365ef3d35410c50283c4dd038a1b6fedf526d5b193453d796f6e63c144bbda62763740468e218916410671318e83da3c2ade5f6da6482b09fca5c823eb4d9933feae17d165a6db0e94bb09574fc1f7b8edcfbcf9e9696b6173f4b61403020001011603020030cbe6bf1ae7f2bc40a49709a06c0e3149a65b8cd93c2525b5bfa8f696e29880d3447aef3dc9a996ca2aff8be99b1a415716030200309bf02969ca42d203e566bcc696de08fa80e0bfdf44b1b315aed17fe867aed6d0d600c73de59c14beb74b0328eacadcf9')

ApplicationData
1703020030063c60d43e08c4315f261f8a4f06169acdb5818d80075143afe83c79b570ab0b349b2e8748f8b767c54c0133331fb8861703020030cd839b95954fcadf1e60ee983cbe5c21ac6f6e1fe34ae4b1214cded895db4746b8e38d7960d7d45cb001aab8e18c7fc717030200308092d75f72b16cb23a856b00c4c398988df099441e10dca5e850398e616e4597170796b7202e2a8726862cd760ebacdf17030200308e9f83b015fce7f9c925b8b64abee426224a5fbd2d9b8fc6ded34222a943ec0e8e973bcf125b81f918e391a22b4b0e6517030200300e24ba11e41bfcf66452dc80221288cea66fb3aed9bdc7e08a31a0e7f14e11ce0983ec3d20dd47c179425243b14b08c917030200300465fdb05b121cdc08fa01cdacb2c8f4eff59402f4dbf35a85cc91a6d1264a895cd1b3d2014c91fbba03ec4c85d058c91703020030e2ddbbb83fe8318c41c26d57a5813fab89549a874ff74d83e182de34ecf55fff1a57008afd3a29ef0d839b991143cd2a1703020030524f5210190f73c984bd6a59b9cf424cb7f30fafe5ea3ac51b6757c51911e86b0aa1a6bbf4861c961f8463154acea315170302003032765985e2e594cddca3d0f45bd21f49a5edfe89fdb3782e2af978585c0e27ba3ef90eb658304716237297f97e4e72bc1703020030e0ae69b1fa54785dc971221fd92215fb14e918a9e6e37139153be8cb9c16d2a787385746f9a80d0596580ba22eaf254e

What we want to do now is create the following conversation:
CH->
<-SH, CERT, SHD
-> CKE, CCS, FIN
-> APP, APP ,APP

This will be enough for Wireshark to decrypt the traffic. However, since we removed some messages (the whole HeartbeatMessages) our HMAC's will be invalid.

We need to record an interleaved transmission of these message with Wireshark. I will use these simple python programs to create the traffic:


If we record these transmissions and tick the flag in Wireshark to ignore invalid HMAC's we can see the plaintext (if we added the private key in Wireshark).

Challenge Creation

I used our TLS-Attacker project to create this challenge. With TLS-Attacker you can send arbitrary TLS messages with arbitrary content in an arbitrary order, save them in XML and replay them. The communication between the peers are therefore only two XML files which are loaded into TLS-Attacker talking to each other. I then copied parts of the key_block from the debug output and the challenge was completed :)

If you have question in regards to the challenge you can DM me at @ic0nz1
Happy Hacking

Related articles


  1. Hacking Games
  2. Hacking Academy
  3. Tutoriales Hacking
  4. Body Hacking
  5. Tipos De Hacker
  6. House Hacking
  7. Herramientas Hacking
  8. Wifi Hacking App
  9. Curso Growth Hacking
  10. Aprender A Hackear Desde Cero
  11. Hacking Forums
  12. Hacking Con Python
  13. Hacking Meaning